Firmware in the circuit simulation: Arduino, ESP32 and Pico
October 13, 2026
An AI agent can write an Arduino sketch from a short description. Checking it is the hard part. Without the board on the desk the code can only be read, and code that compiles can still drive the wrong pin or move a servo too far.
In FloMotion the sketch lives in the project next to the schematic, in a codebase. It is compiled with the standard Arduino toolchain, and the compiled program runs in the circuit simulation on an emulated chip. The board in the schematic does what the real board would do with that program flashed.
Example: a robot head that looks around
A common first robot part is a servo that turns a head or a sensor from side to side, driven by an Arduino Uno. The schematic needs three connections: D9 to the servo's signal wire, and 5V and GND to its power wires. The request to the agent is one sentence: sweep the servo on D9 between 20° and 160°, and light the on-board LED while it sweeps back. The limits keep the head clear of the frame.
The agent writes the sketch, builds it and attaches it to the Uno.
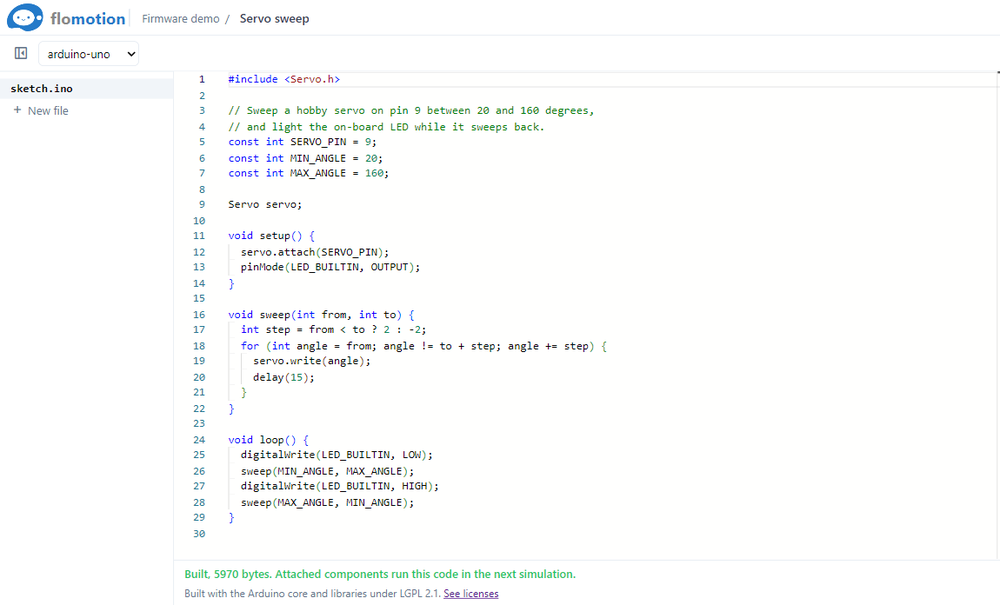
Starting the simulation runs the compiled sketch. The Servo library sends real pulses on D9, and the servo in the drawing follows them.
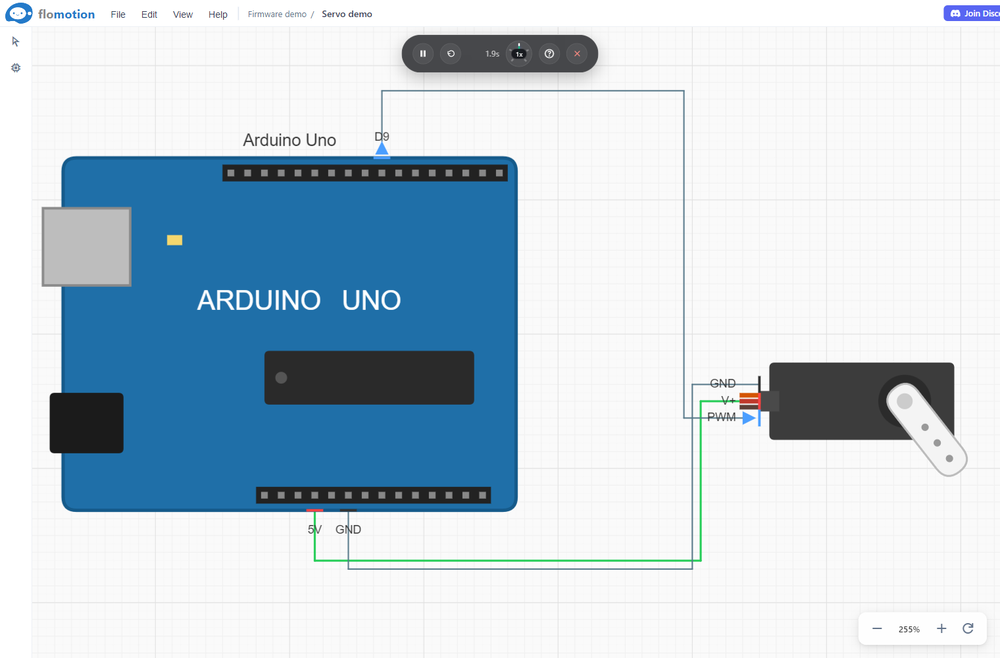
Mistakes show up the way they would on the bench, without the bench. If the sketch uses pin 10, the servo stays still. If the limits are wrong, the head swings too far. The emulator runs the program exactly, but the servo and its supply are models, so a sweep that looks right is a reason to flash the board and try it, not proof that it works.
Codebases
A codebase is a project item, listed with the schematics, workspaces and scenes. It holds a set of text files for one board: an Arduino sketch (.ino) plus any headers and source files, and a list of Arduino libraries by name, such as Servo. Libraries come from a curated catalogue that is part of the toolchain: common ones for servos, steppers, LED strips, buttons, displays and sensors, each at a fixed version.
The editor is the same one used in Visual Studio Code (Monaco), with C++ highlighting and word based completion. Files are saved with Ctrl+S or the save button. A codebase keeps only its latest version, so anything worth keeping should also live in git.
Boards
Each codebase targets one board, picked in the toolbar above the editor. Seven boards run in the simulation, from three families: the Arduino AVR boards are simple and well documented, the ESP32 boards are faster and carry Wi-Fi and Bluetooth on the real chip, and the Raspberry Pi Pico has PIO blocks for precise timing. Each family runs in its own emulator.
| Board | Chip | Emulator |
|---|---|---|
| Arduino Uno | ATmega328P | avr8js |
| Arduino Nano | ATmega328P | avr8js |
| Arduino Mega | ATmega2560 | avr8js |
| ESP32 DevKit | ESP32 | FloMotion's own ESP32 emulator |
| ESP32-C3 | ESP32-C3 | FloMotion's own ESP32 emulator |
| ESP32-S3 | ESP32-S3 | FloMotion's own ESP32 emulator |
| Raspberry Pi Pico | RP2040 | rp2040js |
All of them build with the Arduino framework through arduino-cli, with the official cores (arduino:avr, esp32:esp32 and the Earle Philhower rp2040 core).
Building
The build button compiles the current files on the server, with each board vendor's official Arduino core. Builds are cached by the content of the files, the board and the libraries, so building the same code twice answers at once.
Errors and warnings appear under the editor with file and line, and a click jumps to the line.
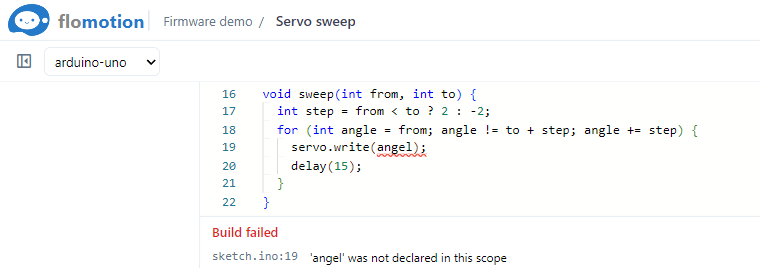
A successful build shows the size of the compiled program. The Arduino cores and most libraries are LGPL 2.1, and the build result links to the licence notes. Building is free.
Building on a local computer
Code that needs a library outside the catalogue, or its own build options, is compiled on the developer's own computer with arduino-cli and brought in through the desktop command line. With the codebase open, flomotion import takes the compiled file (.hex for the Arduino boards, the merged .bin for the ESP32 boards, .bin for the Pico) and stores it as the build of the codebase's current files. The simulation runs it like any other build. An external coding agent handles this the same way: it reads the files, compiles them locally and imports the result.
Attaching code to a board
Once a codebase builds, the agent attaches it to the board part in a schematic of the same project. The attachment maps the part's connectors to the board's pin names (D9, A0, GPIO2, GP25 and so on). Connectors already named after a board pin map to it automatically, and connectors named 5V, 3V3 or GND are supplied at that voltage, as if the board were powered from USB.
When the simulation starts, the board part runs the latest successful build of its codebase. The emulated chip drives the circuit through its pins: digital outputs, PWM, servo pulses, and analog reads from the circuit's voltages. What the firmware prints on Serial is captured in the simulation log. Parts without firmware keep their behaviour scripts, so a board running real code can sit in the same circuit as simpler modelled parts.
If the files changed since the last build, the simulation runs the older build and says so in a warning. With no successful build, it reports that the firmware is not built.
The firmware agent
Opening a codebase gives the agent a firmware role, with tools to read and write files, build, read the compiler's errors, and attach the code to a part of a schematic in the same project. A typical request describes the behaviour in terms of the design: read the potentiometer on A0 and move the joint servo on D9 to match, staying between 20° and 160°. The agent writes the sketch, builds it, fixes compile errors from the build output, and attaches it to the board with a pin map read from the schematic.
Trying the code in the circuit happens on the schematic. The agent opens it, which switches it to the electronics role, runs the simulation and reads the firmware's Serial output in the log alongside the circuit's voltages and events. The same tools work from an external coding agent through the desktop command line.
The agent handles the routine parts of this loop well: a typo the compiler names, a pin that does not exist on the board, a library that needs including. It can still get the logic wrong, pick a library that does not fit, or write code that compiles and does the wrong thing. Reading the sketch before flashing it is still part of the job.
What the emulators do not cover
The emulators run the compiled program, but some hardware is not modelled:
- I2C sensors do not respond, and there is no Wi-Fi or Bluetooth.
- Serial is output only.
- Firmware runs in the circuit simulation, not in a control scene.
- Timing is not exact everywhere. ESP32 loops that print or compute on every pass run slower than on the chip, and the Pico runs core 0 only.
Summary
A codebase holds the Arduino sketch for a robot inside its project. It builds on the server for seven boards across the AVR, ESP32 and Pico families, and code that needs other libraries can be built locally and uploaded. Attached to a board part in a schematic, the compiled program runs in the circuit simulation, so code written by the firmware agent can be checked against the wiring before any hardware is on the desk.
Links
- avr8js and rp2040js, the open source AVR and RP2040 emulators from Wokwi.
- arduino-cli, the toolchain used for builds.
Try it yourself
Open the workspace, describe a part, and see what the agent does with it. No install, no setup. Sign-in is optional for the first run.
Start building